

How to Make AI Story Videos with Whisk AI
Making an AI story video with Whisk AI starts with a sequence of images that already tell the story. Create an approved character, build a separate image for each shot, animate those images in the video workspace, then assemble the clips with narration and sound in a video editor.
You can prepare the stills in the Whisk AI image workspace and animate them in the video generator. The method below uses a four-shot mystery as a planning example: a courier finds a key, notices a blue door, tries the key, and discovers warm light behind the door. It is a suggested production workflow, not a claim that we generated and tested a finished film.
Can Whisk AI make a complete story video?
Whisk AI provides image creation and video-generation tools. A coherent story also needs shot selection, timing, continuity, and usually an editing pass. For a first project, generate one manageable action per clip and assemble the approved sections in an editor rather than ask one prompt to handle the entire plot.
On the video page, inputs, duration, resolution, aspect ratio and audio options depend on the selected model. At the time of checking, the Seedance 2.5 option offers multimodal references and a separate first/last-frame mode. Those are different ways to guide a clip, not a promise that every reference detail will survive motion.
1. Write a story you can show in four shots
Start with a visible action and a visible consequence. “A courier discovers a mysterious door” becomes easier to direct when you decide what the viewer must notice in each shot.
| Shot | What the viewer learns | Still-image composition | Motion to request |
|---|---|---|---|
| 1: Discovery | The courier has found something unusual | Medium shot, courier looking toward a small key on wet pavement | Courier lowers their gaze; gentle camera push |
| 2: Clue | The key belongs to the blue door nearby | Key in the foreground, blue door visible behind it | Rain ripples; restrained focus change |
| 3: Choice | The courier decides to investigate | Courier holding the key close to the lock | Hand moves a short distance toward the lock |
| 4: Reveal | Something unexpected is behind the door | Rear view, door slightly open, warm light visible | Door opens slowly; light spills onto the pavement |
Plan approximately five seconds per clip for a roughly twenty-second assembly, if the selected model supports that duration. Trim the usable parts in editing; the finished runtime does not have to equal the sum of all generated footage. A longer story can use more shots, but extra seconds will not rescue an unclear sequence.
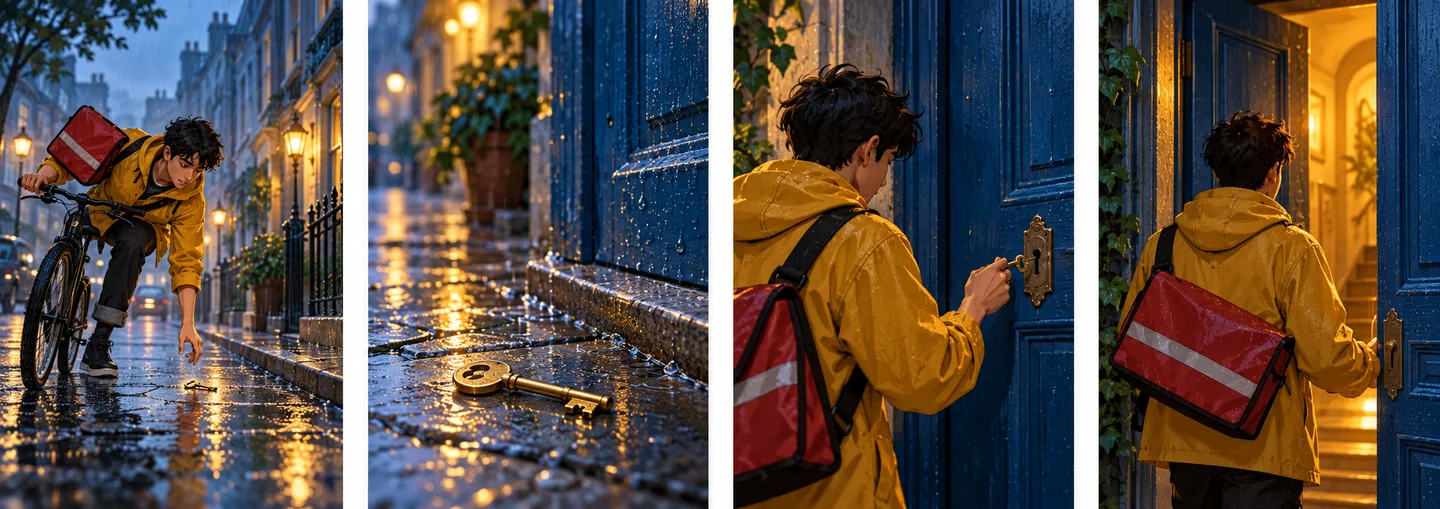
Original editorial storyboard illustration. It demonstrates the proposed shot sequence, not a Whisk AI model-output test. Generate each production shot separately rather than upload this entire strip as one starting frame.
2. Approve the character and location before making every scene
Create a reference you can recognize at a glance. In our example, the courier has short dark hair, a mustard raincoat and a red messenger bag. The location has a blue wooden door, a brass lock and wet pavement. Keep those anchors fixed across the project.
In Whisk mode, use Subject for the courier, Scene for the location and Style for the visual treatment. A style reference should guide lighting and rendering without introducing a different face or costume. You can refine the generated prompt with explicit details to preserve.
A starting image prompt might be:
A young adult bicycle courier with short dark hair, a mustard raincoat and a red messenger bag stands on a rainy street beside a blue wooden door with a brass lock. Medium three-quarter view, cool blue evening light with a small warm glow around the door, cinematic storybook illustration. The courier looks down at a small brass key on the wet pavement. Keep the face and clothing clear, with space around the hands.
Inspect the result before approving it. If the bag or coat is wrong here, correct it now. Carrying a flawed baseline into every shot multiplies the work. Save the accepted reference, its prompt and the chosen settings together.
For a deeper method of choosing identity anchors and reviewing drift, use the character and product consistency guide. For this story, you only need a small set of reliable visual rules.
3. Generate one still image per shot
Return to the original approved character and location references for each new image. Do not rely on a fresh generation remembering the last scene. Keep the model, visual style and delivery aspect ratio consistent unless a deliberate creative change requires otherwise.
For a vertical short, choose a supported portrait ratio such as 9:16 and compose every still for it. For a landscape film, use a suitable landscape ratio. Leave room for subtitles and avoid placing the key clue against the extreme edge.
Here is an instruction for shot 3:
Use the approved courier and blue-door references. Preserve the same face, short dark hair, mustard raincoat, red messenger bag, blue door and brass lock. Show a close medium view of the courier holding the brass key just in front of the lock, before insertion. Keep the hand visible and the door closed. Match the rainy blue evening light and cinematic storybook style of the approved reference.
The word “before” matters: it gives the animation a clear starting state. If the still already shows the door fully open, asking the video to open it creates a conflicting instruction.
Lay the stills side by side before animation. Check the character's identity, bag position, door design, key shape, light direction and action order. Fix the sequence at this stage; a video model is not a dependable repair tool for an inconsistent storyboard.
4. Move the approved shot into the video workspace
Open the Whisk AI video generator, select a model that accepts your intended image input, and inspect its current settings. Start with one shot and one output so you can evaluate the motion before generating a larger set.
For the Seedance reference workflow, choose Multimodal references and upload the approved shot image. The page also offers Add from URL and From history as source controls. If the required image is not available in the picker, use its downloaded original. When referring to uploaded media in the prompt, use the interface's reference selector rather than assume a typed filename automatically binds the image.
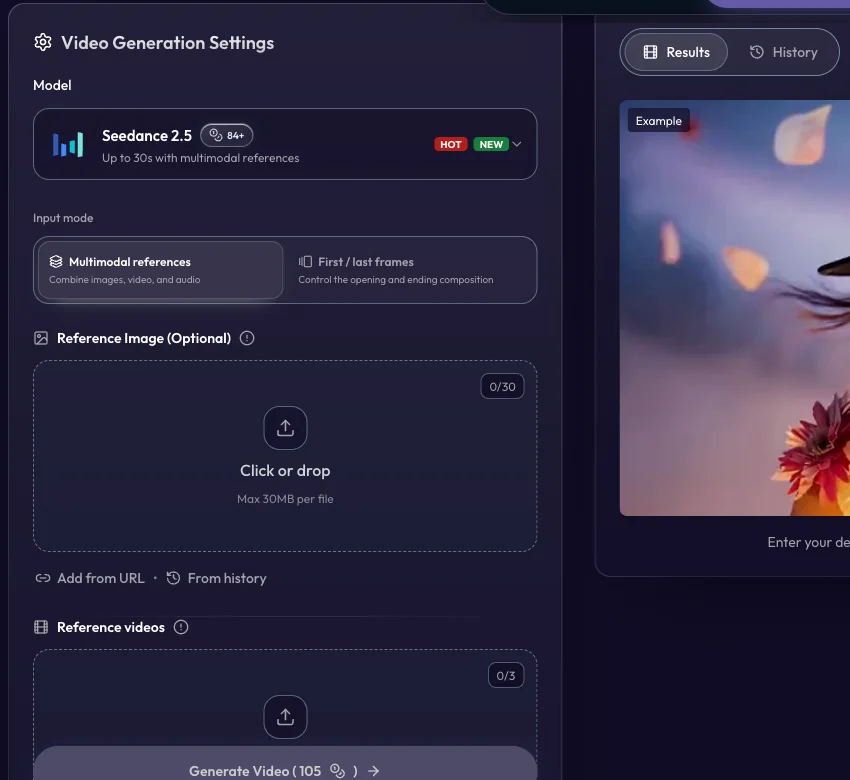
Actual Whisk AI workspace captured October 17, 2026. The example preview belongs to the tool; it is not the story result described in this tutorial.
If you need the clip to start from a particular composition, the Seedance First / last frames mode is a useful alternative. Add the first frame, then an optional last frame. This mode cannot be combined with the separate image, video and audio reference inputs. Review the current mode before uploading, since changing modes changes which inputs are used.
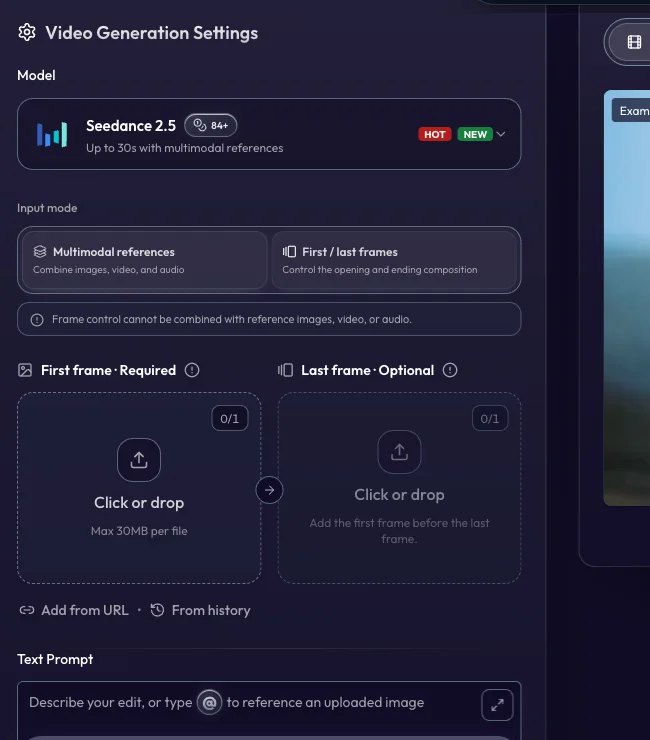
Actual frame-input controls. Starting and ending images guide the endpoints; the intervening action still requires review.
5. Describe the motion instead of rewriting the whole image
The image supplies the appearance and composition. Use the video prompt to explain the next movement, camera behavior and stopping point. Begin with one subject action and one restrained camera instruction.
For the discovery shot:
Use the uploaded image as the visual reference. The courier slowly lowers their gaze toward the brass key on the wet pavement. Rain continues softly. The camera makes a gentle push toward the courier. Preserve the face, mustard raincoat, red messenger bag and blue door. Keep the same illustration style. One continuous shot; no cut to another location.
For the reveal:
Use the uploaded opening image as the starting composition. The blue wooden door opens slowly a small distance and warm light spills across the wet pavement. The courier remains facing the doorway with their back toward the camera. Keep the same coat and red bag. The camera stays almost still. End before the courier enters.
Treat these as prompts to adapt, not tested output guarantees. If the motion is too ambitious, reduce it. “Walk to the door, insert the key, open it, react and enter” asks for several difficult transitions. Separate those actions into shots, or cut from the key near the lock to the door opening. An insert shot can communicate the missing action without forcing a complicated hand interaction.
6. Inspect the whole clip, then fix the right stage
A good first frame does not establish a usable video. Watch the entire clip, then inspect the beginning, middle and end for facial changes, distorted hands, moving accessories, disappearing props and changes in background geometry.
| Problem | What to revise |
|---|---|
| Wrong coat, face or doorway before motion begins | Correct the source still or reference selection |
| Character changes only after movement starts | Reduce motion complexity and reinforce identity constraints |
| Key or fingers merge during the action | Simplify the gesture or replace it with an insert/cutaway |
| Camera reveals an inconsistent unseen area | Use a smaller camera move or a more complete source composition |
| Clip is attractive but does not advance the story | Revisit the shot's narrative purpose |
| Shots feel disconnected | Compare lighting, screen direction and the last/first usable frames |
Download each accepted clip and name it by shot and version, such as shot-03-key-v02. Preserve the approved source images separately. If you reuse a generated final frame to continue an action, compare it with the original identity reference first so accumulated errors do not become the new character design.
7. Assemble the story, narration and sound
Import the accepted clips into a video editor. Put them in story order, trim pauses and cut at the moment the viewer understands each action. Keep the courier's movement direction consistent where possible; use the close-up of the key to bridge a difficult transition.
Add narration, captions, music and effects in the editor as needed. Supported models may generate audio, but matching voices, music and ambience across separate clips still needs review. A separately recorded narration track gives you a consistent voice over the whole sequence.
For this story, narration could be as simple as: “The last delivery had no address. Only a key.” Let the images carry the reveal instead of describing everything visible. Use audio and other assets you have permission to publish.
Before export, watch once without sound: can you follow the discovery, clue, choice and reveal? Then listen without looking: does the narration make sense? Finally, check captions and the crop on the intended viewing device.
How to keep the first project manageable
Start with one character, one location and four shots. Approve the stills before paying for motion, and check each clip's displayed credit estimate before submitting. Duration, resolution, audio, reference media and batch count can affect the charge; the current pricing table and active tool settings are the appropriate places to check.
Build a longer film from accepted clips. A one-minute story might use a dozen short shots, with room for rejected attempts and editing, rather than a single minute-long request. This is a planning approach, not a claim that all available models support the same clip length.
Your first deliverable should be a sequence the viewer understands, with a recognizable character and intentional cuts. Start by creating the four stills, then animate the clearest shot before producing the rest.
Written by the Whisk AI team. Tool controls and workflow checked October 17, 2026. The prompts and story are original planning examples; no paid generation benchmark or finished-video test is claimed.